Whether you’ve heard about it or not, Google has been using some new site speed metrics to decide which websites to prioritize in the search results.
And if you’ve had your existing WordPress website for any number of years, your site has likely accumulated a lot of “fluff” over the years that may be slowing it down.
At least, ours had.
That’s why we decided to undertake a full website redesign and build our site from scratch in a staging environment, to improve our site speed.
Throughout the redesign, we used our staging website to test new plugins and WordPress themes, and in this post, you’ll see the full behind-the-scenes WordPress website rebuild process.
In the first part of the post, you’ll see the process for handling staging sites and in the second part, you’ll see our rebuild process and some of the mistakes we made along the way.
Let’s dive in with a few staging site definitions first.
Staging Site Definitions
Before we dive into the how-to section, let’s make sure we’re all on the same page with the important definitions. Nobody likes tech jargon that goes over their head.
What’s a staging site?
A staging site is a copy of your website that you can use to test changes before you make them live. This is a great way to try out new plugins, themes, or code changes without risking your main website.
We recommend using a staging site any time you’re making changes to your website – it’s a great way to avoid downtime and keep your website running smoothly.
A WordPress staging site is a WordPress website that you can edit behind the scenes and move to a live site when it’s ready. A staging environment can be used to make big changes or small changes, so it’s very handy.
Usually, a staging site will not be visible to search engines unless you specifically enable these settings. That means only your live website will be listed in the search engines and you don’t need to worry about duplicate content or Google getting confused.
What’s a production site or live site?
A production site is your main website that is visible to the public. A live site is a website that is online and accessible by anyone. These terms are often used interchangeably.
This means you likely won’t want to make any drastic changes to production or live sites, in case something breaks or things don’t look good for a while.
That was the case in our website redesign. We knew we wanted to change our entire WordPress theme, which meant there would be a messy “in-between” period where things would not be presentable. That’s why creating a staging site was key for our redesign.
Now that we know a bit more about the differences between a production site and a staging website, let’s dive into the process.
First, Create a WordPress Staging Site
The first thing we did was create a staging site on our WP Engine hosting account (we’re proud affiliates and have been happy customers for nearly a decade).
Your hosting provider should have a way to help you create a staging site, but if they don’t there are WordPress staging plugin options that will do the trick. (That’s the beauty of WordPress sites, isn’t it?)
In WP Engine, it’s just a matter of clicking on the “Add Site” button and then choosing the option that best suits your needs.
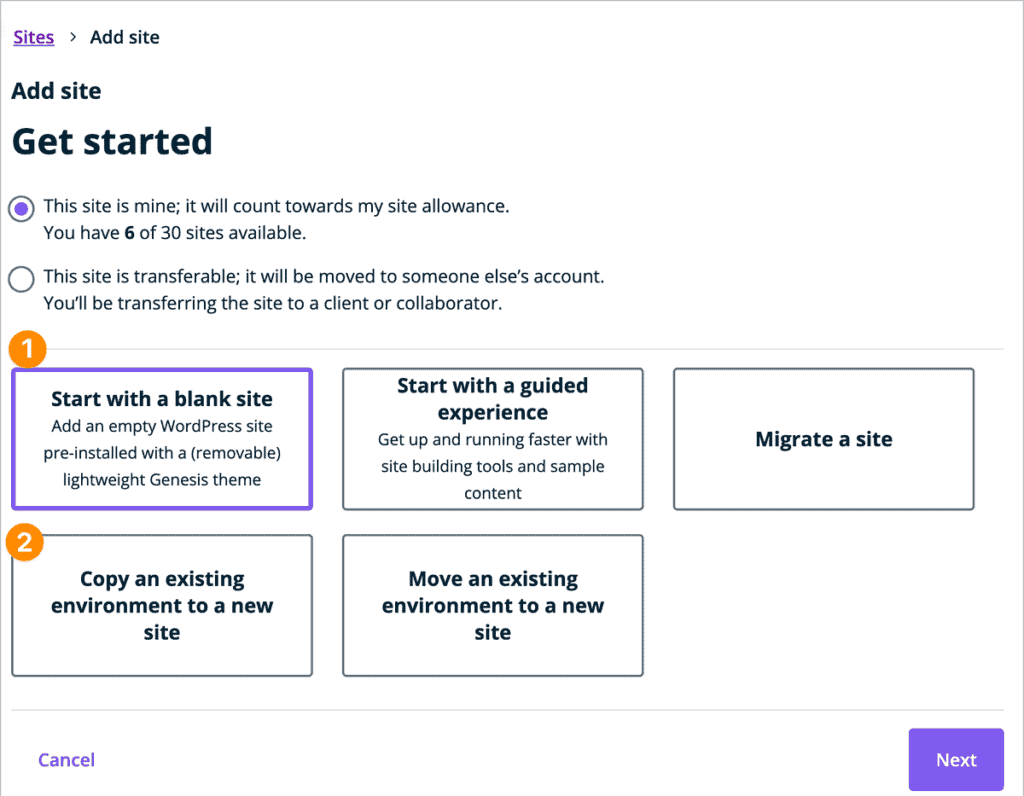

In most cases, you will want to copy an existing environment to a new site. But keep reading to find out why we didn’t do it that way, and whether or not you will want to do the same.
Depending on your hosting provider, you might be able to create multiple staging sites and move between them. At one point we had a production website on WordPress, a development staging site WordPress, and a new staging site for testing new WordPress plugin options.
To Copy The Live WordPress Site to Your Staging Environment or Not?
In most cases, we might want to make a copy of our live WordPress site on top of your new staging site. That way you can have all of your content, media files, database tables, and plugins ready for editing.
However, in our case, the goal was to do a whole website rebuild and to leave behind as many of the WordPress plugins that we no longer needed. It made sense to start with a fresh install through our web host, so we would have just the basic WordPress files to start with.
That means we were creating a brand new staging WordPress site, that we intentionally kept blank and only copied over the post and page content manually.
Most of the time, if you’re doing a few smaller changes or not trying to redo your entire site as we did, you will copy your existing production site to this new WordPress staging environment.
That means you get a full copy of your site that you can edit, and then copy back to your live site when you’re ready.
Since we decided to start with a blank slate, we used the WordPress Importer plugin, which lets you copy data from any hosting server into a live website or staging website.
(You can skip this step if you copied your live site instead!)
Our Goals for the Website Rebuild
For most people looking to set up a staging website, the goals are usually to make changes across the board or test new settings and plugins.
Our goals were to completely rebuild our site, with 4 main aims:
- To improve our site speed
- To clean up old code, images, plugins, and things that had accumulated over the past 8 years on our site
- To test new plugins and themes that would help us out
- Simplify the look and feel and modernize it
That meant we wanted to research new tools and also start with a clean slate.
It’s not every day that companies choose to rebuild a site from scratch, and it’s definitely not for the faint of heart.
I think we really wanted that clean slate and taking a step back to see what was still serving us and what might have come on the market since we started our site that might be better.
We had also done some user testing on our site data and realized that people often completely glazed over any of our “dark navy background” blocks. That is part of the reason we decided to change our color scheme to live site colors that are lighter and do not contrast as much.

How We Chose Our New WordPress Theme
We used another site of ours in a staging site set up, so we could start testing different WordPress themes.
It’s nice to have different websites to test on and play with, and in this case, we decided to redesign our PopupAlly product site first since it’s a much smaller site and we could give any theme or plugin we decided on a full test.
It’s often not until you try to really use a WordPress theme or plugin that you realize its’ limitations.
We wanted something that would work well with our content and look great on all devices, so we tested a few different themes until we found the right one.
In our case, we’ve been Beaver Builder fans for years, but we wanted to try something that used the Gutenberg blocks more natively, in case we decided to move over to Gutenberg in the future.
That way, we wouldn’t have to rebuild our site from scratch more than once.
I love working on a staging website as much as the next gal, but this isn’t a process I want to repeat all that often!
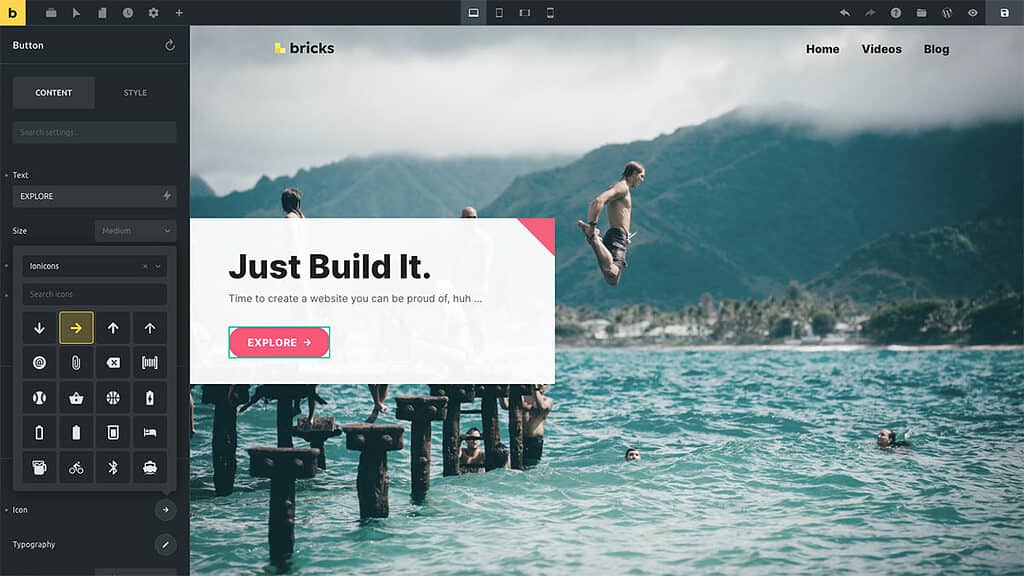
In the end, we went with a recommendation from our resident tech stack genius Scott Macon, and we gave Bricks Builder a try.
It’s still a relatively new theme that includes a builder built into the theme and also saves blocks as native Gutenberg blocks. You’ll notice that they are still often releasing new versions and that was a good sign for us in choosing it too.
Now that we knew what theme we’d be going for, we came up with our staging site rebuild plan.
The Plan for the Staging Site Rebuild
When it comes to doing a site redesign and rebuild, you typically have two options: to hire it out or do it yourself.
We decided to dedicate a few months to do it ourselves internally because we’ve had success with doing it that way in the past.
We’re a small team and we were able to split the work across 6 people while keeping our software developers focused on their development work as much as possible.
1. Setting Up the WordPress Staging Site Foundation
On our fresh WordPress website in its’ staging environment, we had a blank slate.
From the WordPress dashboard, we started by installing the Bricks Builder WordPress theme.
Then we installed the other core plugins that we knew we’d be using, like PopupAlly, Nested Pages, and SEO Press.
Then we imported all of our content, including multiple gigabytes of images from our live site.
At this point, I also set up a few Bricks Builder templates for the main look and feel of the pages that we could use as a starting point.
With Bricks Builder you can also export templates from one staging site to another, so we were able to share templates between the WP staging site for our other domain easily.
We had everything we needed, including the URL site structure that we originally had in place, and it was time to move on to the next step of our plan.
2. Divide and conquer
Next, I ran a crawler over our live site to generate a list of URLs and site pages for our entire website.
Then I took this data into Google Sheets, where I divided the pages by type so we could easily assign them to different members of the team.
You can do this using the live website links or do a search and replace to show the staging site links, so it’s easier to click a link and edit each page.
For example, we had all of the feature pages together, all of the comparison pages together, and so on.
Then a team member would be responsible for converting each type of page, so it would be easier to keep everything consistent and also keep track of the work that was being done so no one mistakingly worked on someone else’s page at the same time.
We didn’t have to edit any of the blog posts in the staging environment, because we built a template that would automatically apply to all blog posts.
The spreadsheet approach also made it easy for us to leave notes or questions, and revisit if we had to switch tasks during the day. Using different colored backgrounds on each cell row is simple and it works!
3. Record WordPress Staging Site Training Videos
Before we hit “go” on the site rebuild, I made a few training videos and live training with team members to go over the basics of the new Bricks Builder theme.
Bricks Builder is a powerful theme and with that comes more complexity, and we did discover certain features and settings further down the road of the rebuild that would have saved us some trouble earlier on.
For example, in the WordPress admin sidebar, we could access templates and code settings but we didn’t realize we could create classes to apply directly inside Bricks.
We also made liberal use of saving our templates in Bricks Builder, so we didn’t need to start from scratch on each page. This saved everyone a lot of time and shortened the building time.
We also made sure everyone working on the site redesign had a WordPress admin account with the right permissions on the new staging site.
Finally, we had everything in place to start the site rebuild!
Start Rebuilding the Staging Site Manually
It took several weeks, and every team member worked on rebuilding a few pages each day on the staging site.
For some team members, this was a tricky balance between their regular tasks and responsibilities and others were able to clear their plates and focus completely on the site rebuild.
We did plenty of copy and pasting and selecting images to fit into the new templates, and a bit of light rewriting along the way.
I’m not going to sugarcoat it: this was grunt work!
But we eventually got all of the pages rebuilt, and now it was time to do a bit more cleaning up of our WordPress files on the staging site.
Clearing out unused images on our staging site
I wanted to clear through almost a decade of images that we may not be using anymore. At one point, we were known as AmbitionAlly so we still had a bunch of images with that logo that I knew we were not using anymore.
It felt tedious to go through the Media Library by hand and try to delete old images. Especially because I was afraid we might delete images that were still being used somewhere.
That’s when we found Meow Apps’ Media Cleaner plugin.
I sprung for the paid version to make sure that we could capture any images used in our theme or outside of regular blog posts.
We did end up deleting a few images that were still embedded in some blog posts, but for the most part, we were able to delete almost a gigabyte of images that we no longer used.
Luckily, all of this happened on our WordPress staging site, so we were able to grab some of the deleted images from our backups. That’s the benefit of working with a WordPress staging website on a web host like WP Engine.
Testing The Staging Website
Before going live with the new website from our staging environment we did a bit of testing. I’ll admit upfront that we really dropped the ball on mobile testing our staging site, but I’ll talk more about that in the next section.


1. We ran Google Search Console Speed Tests
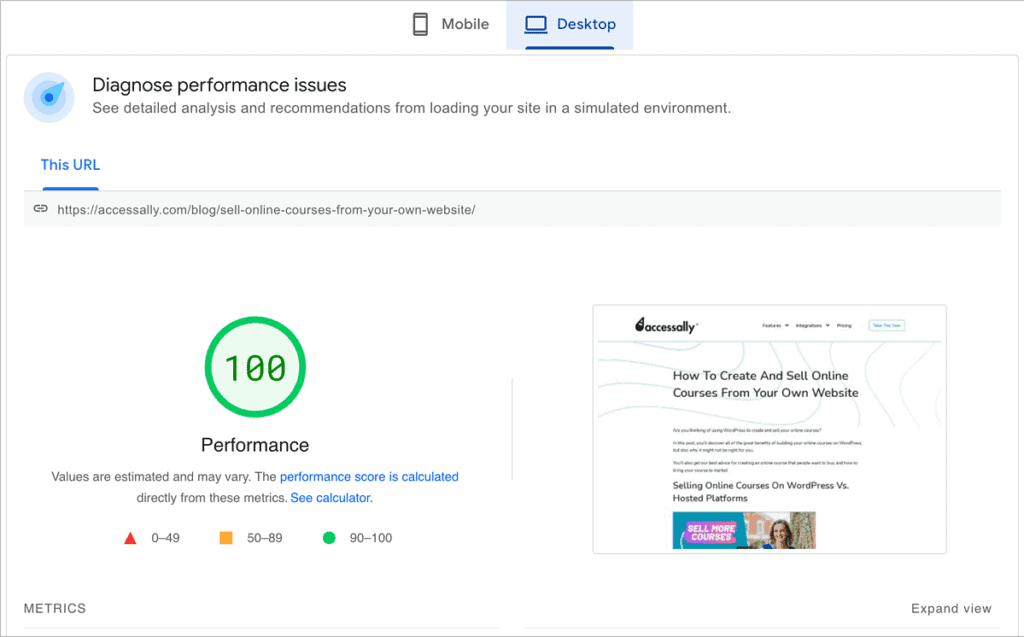
The first thing we did to meet our goal of speeding up our pages was to run some speed tests.
All of the speed tests were fast, but we only tested some of our primary pages on our staging site.
One thing we missed was testing pages with YouTube videos embedded in them, and that was something we had to fix after we went live. More on that in a second.
It doesn’t matter how fast your WordPress website is if you are loading scripts from another server like YouTube. That can affect the site speed, and it has nothing to do with being on a staging site or live site.
2. Final spot check on all pages
Next, we went back through our spreadsheet and checked all of the pages for any copy-and-paste mistakes, or anything that might have been missed during the rebuild.
This was a tedious task, but it felt necessary to make sure we went live with a site we could be proud of.
This task added another week or two where we were working on our WordPress staging site and our live WordPress site was still our old one.
3. Reinstall a few other key plugins & test
Next, it was time to reinstall our key WordPress plugins. These plugins are essential to the functionality of our site, so we couldn’t skip this step.
Here’s the list of plugins we kept (I know you’re curious about what goes on other people’s production sites too!):
- AdRotate
- Better Search and Replace Pro
- FluentSMTP
- GDPR cookie Consent
- Nested Pages
- PopupAlly Pro
- PublishPress Checklists
- SEOPress Pro
- ShortPixel Adaptive Images
- Social Image Generator
We had a few settings to work through after re-installing these plugins, and we were able to import our popup designs and other settings easily.
Now that our staging environment was set up and our key plugins were reinstalled, it was time to check to see if everything was loading correctly.
Because we use WP Engine and they run a regular backup schedule, we always have a copy of all of our sites, so that meant that if we did forget anything we could always load up a backup to recover things.
We also exported and saved any data from the live site that we wouldn’t want to overwrite when we made the staging site live.
Stumbling After Going Live into Production
Now we were eager to show our new website to the world and start reaping some of the benefits of all this work.
So we hit that staging site button to go from “staging to production”.
Then mortification set in because…
1. We completely failed to test for mobile readiness
Even though we have this blog post all about the different mobile screen responsive sizes, and we all have mobile phones… we completely failed to test on mobile.
I admit that my rush to go live with the new site is to blame for this, and it was only after we pushed the staging site into production that we realized our site didn’t look good on mobile.
So we quickly went back to our pages spreadsheet and updated some of the mobile views, to improve font sizes and padding so that the reading experience was much better on phones and tablets.
Mobile testing should clearly have been a part of our staging site testing process, and I want to emphasize that here as a reminder for myself and anyone else going through this process.
Luckily Bricks Builder has some amazing mobile design features with built-in breakpoints. Creating a staging site meant we could have switched back to our original site, but we decided to forge ahead and just make changes on the live site.
In retrospect, it would have been less stressful to revert to the existing site instead of making so many edits quickly.

2. The site was initially slower than our old site!
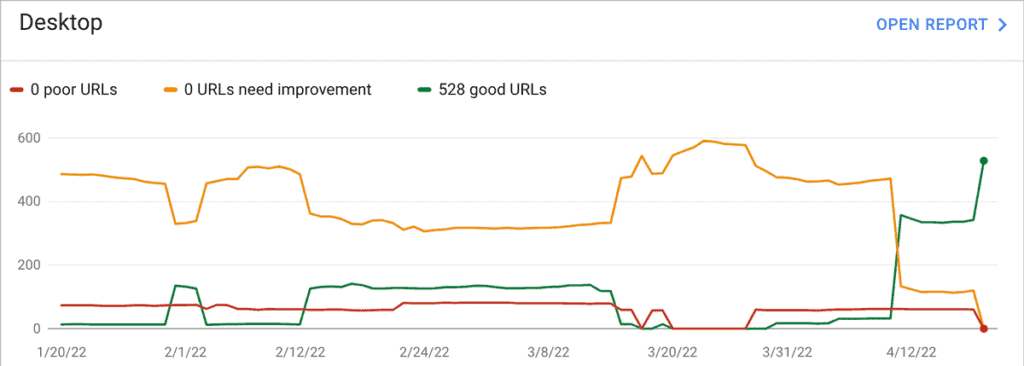
Because we rebuilt everything from scratch and Bricks Builder is such a lightweight theme, we thought our site would just load faster naturally. At least, that seemed to be the case on the staging server.
So we didn’t re-install the optimization plugins we had on our production site, and our new site speed was actually slower than our original site. Doh!
This was another forehead-slapping moment and it took us a few days to realize this since Google Search Console is not an instantaneous reporter of issues like these.
Once we realized it we quickly re-installed the Autoptimize plugin that we originally had on our WordPress website to help us minimize our code and optimize certain things.
This helped, but I was still not satisfied. So I installed WP Rocket and that seemed to be helping, but during my research about the best caching plugins for WordPress websites I found FlyingPress.
I decided to pay for and try out FlyingPress and disable Autoptimize and WP Rocket and I was amazed by the results.
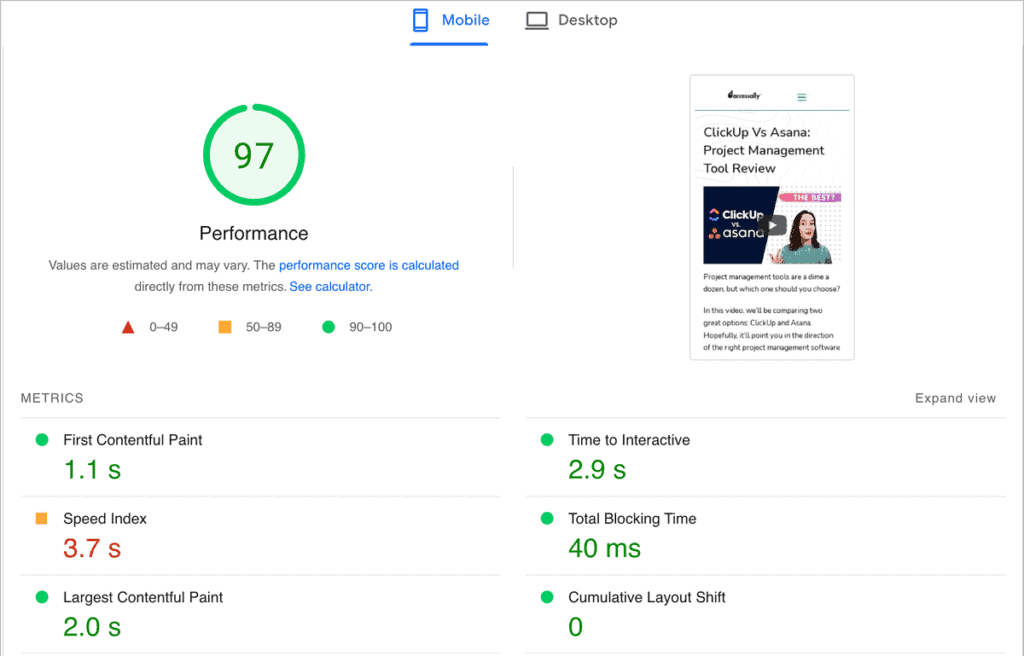
The site was loading so much faster as a visitor and also passing all of the tests that Google gives us for site speed and on-page experience.
Here are the results of switching to the FlyingPress optimization and caching plugin:
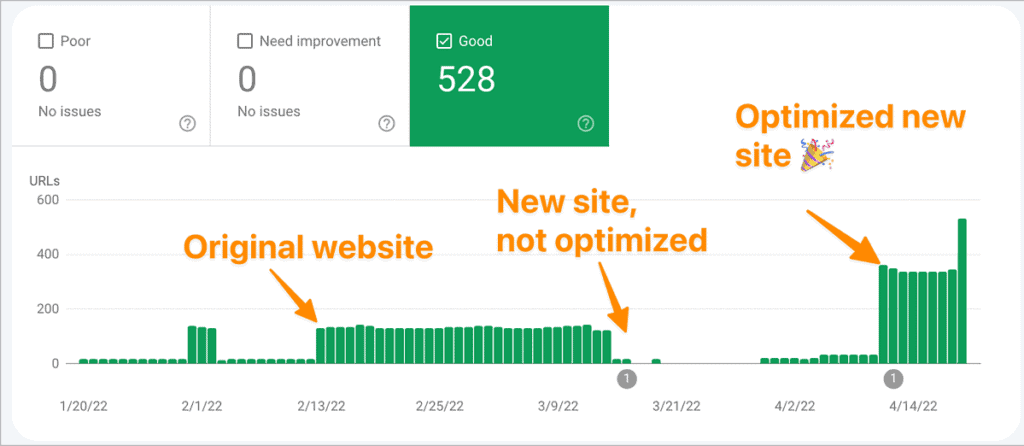

I couldn’t recommend it more for any public-facing website. I wish we had known about it and that we had installed it on our staging site, so we wouldn’t have experienced a dip in search results as we did.
Hindsight is always clearer, so I’m hoping these tips help you when trying to optimize your WordPress site for speed.
I don’t recommend turning on caching like this for a membership site though, because it could affect people’s experience when they are logged in.
The Results Of Our Staging Site to Live Site Rebuild?
So are we happy with the process of building a staging website from scratch?
I think so, even though it wasn’t the smoothest roll-out and we had some stumbling blocks along the way.
This does feel like the WordPress site foundation that can help us keep growing and evolving, and I don’t see us having to rebuild our site from scratch like this anytime soon.
Beyond our happiness, did we meet our goal of making the search engines happy? Yes, I think so.
I also think our WordPress staging website helped us clean up old content and designs, and when we hit that staging site button for our live website, we quickly iterated until we fixed all of the lingering issues.
Like anything, a website is never done.
We are still tweaking the copy and making sure it speaks to our ideal clients.
We learned a lot along the way, discovered some new amazing WordPress themes and plugins, and also got the chance to evaluate what was most important on our website and what could be archived or removed entirely.
I hope this breakdown showing you how to create a staging site and the benefits of working on staging sites will give you the confidence to go out there and give them a go.
And if your WordPress site needs a refresh or a speed boost, give these ideas and plugins a try on a staging site to see if they’ll help.


