If you’re reading this, it’s either because you’re looking to create an online course to generate additional revenue for your business, getting started with your online course-based business, or trying to improve your existing course.
Whether you’re just getting started with online courses or you’re already an online course creator, you know that creating a successful online course is about more than just knowing the stuff you teach. It’s about having a solid plan and strategic execution. It involves key steps that you can’t afford to miss.
In this article, we’ll walk you through the essentials: deciding on your course topic, structuring your course, setting the right price, and choosing the right platform to host your course.
Why Create an Online Course?
Many business owners jump on the online course bandwagon because it’s an excellent way to complement their existing offerings and make passive income. Still, there are those whose income relies entirely on selling online courses.
Regardless of which category you fall into, selling online courses can help you:
- Scale your business beyond the 1:1 setting and without a ceiling on growth. This means you can bring in more money without putting in more hours.
- Position yourself as an expert in what you’re teaching, which can help you attract more customers to your main offerings.
- Help more people at a lower price point than your personalized services.
Here’s how your business can benefit from selling online courses.
No Ceiling on Scaling
If you’re currently serving your customers in a 1:1 setting, the only two ways to generate more income are to increase your prices or put in more hours. It’s doable but not sustainable. Even if you increase your prices and start working more hours, there’s still a ceiling on growth.
So, your best option to scale is to sell online courses. Since they’re a create-once-sell-forever type of product, there’s no ceiling on how much money you can make.
It Adds Credibility to Your Services
Selling online courses can help you get more people interested in your main offers. Why? Because if you’re teaching something to others, you must be good at it. This adds credibility to your brand and shows people you know what you’re doing.
If your online course can effectively help people achieve the expected results, they’ll inevitably ask themselves what results you can achieve for them if they work with you. When people view you in this light, you quickly become the go-to expert in your field.
You Can Help More People
Every business gets contacted by prospects who are interested in their services but can’t afford them. As a business, your best strategy is often to stick to your prices and only onboard those clients who can afford your rates. But wouldn’t you also like to help those who can’t?
Selling online courses allows you to serve them at a lower price point. Instead of paying for your service, they can enroll in your course and learn how to do it themselves – from you.

Step 1: Pick a Course Topic
The topic of your online course will determine whether it’s successful or not. Because let’s face it – no one wants an online course on a subject they can learn about elsewhere for free or with minimal effort.
To make sure your online course stands out and attracts eager learners, choose a topic that not only aligns with your expertise but also addresses a genuine need or pain point within your target audience.
Here’s how to pick a topic that sets your course up for success.
Make Sure There Is a Need for Your Course on the Market
If you create a course on a topic no one is interested in, it won’t sell. So, before you settle on a course topic, do some research to find out if there’s demand for your course. Here’s how.
Research Your Audience
Not every course idea is a winner. That’s why you need to do extensive research to find out exactly what your audience wants.
You can:
- Get on a call with existing or past clients and ask them what they’re struggling with,
- Search for books on your topic idea on Amazon and read the reviews,
- Browse online forums like Reddit and Quora to learn what questions people ask about your topic,
- Find Facebook groups about your course topic and ask their members what they struggle with. Offer them an incentive for answering your questions.
Choose a Topic People Are Willing to Pay For
When choosing your course topic, you should consider:
- What you’re passionate about,
- Where your expertise lies,
- What your audience wants.
The conversion of these three elements is where the sweet spot lies. Still, the best course topics are ones that teach people the skills they need to solve a problem and achieve specific results. At the end of the day, people still buy into the promise of the course and what results they’ll get out of it.


Pick Your Course Type and Title
Once you’ve validated your course idea, it’s time to come up with the course title and figure out how it’ll be delivered.
Pick a title
Something as simple as a title can make or break your course. A bad course title will repel learners even if its content is exactly what they need. A good course title will grab their attention and compel them to learn more about your course.
When coming up with your course title, think about:
- Who is it for?
- What problem does it solve, or what skill does it teach?
- What is the end result it promises?
If you can answer these questions, you’ll be able to come up with a specific and appealing course title. Just remember to keep it short and to the point.
Pick a type of course
There are several types of online courses you can create, depending on your goals.
- Self-paced courses:
Self-paced courses allow learners to progress at their own pace through pre-recorded content. They can be anything from an introductory 101 class to an extensive signature course on a specific topic.
Best for: Course creators looking to make passive income from their courses.
- Membership courses:
As the name suggests, these courses are membership-based, meaning students pay a monthly fee to access the course content, usually for a specific period. These courses usually upload or unlock new content each month.
Best for: Business owners aiming to build a community and generate a stable MRR (monthly recurring revenue) from their courses.
- Live cohort-based courses:
These courses are run live and usually include a Q&A and support from the instructor.
Best for: Business owners who want to test their new course and get student feedback before turning it into a self-paced or membership course.
- Mini-courses:
Mini-courses provide quick, specific knowledge on a specific topic. They’re usually low-priced, so course creators tend to sell multiple mini-courses that complement each other.
Best for: Course creators whose business model is to sell multiple low-priced courses alongside (or instead of) an extensive course at a high price point.
- Email courses:
Email courses deliver course lessons through a series of emails over a set period. This helps engage students and is an excellent way to test the course content and get feedback before making it a self-paced, ever-green course.
Best for: Business owners who prefer to drip-feed the course content via email.

Step 2: Structure Your Course
Surely, you’ve taken some online courses you never finished because they lacked a clear learning path and were hard to follow. If your course isn’t mapped out in a logical way that guides your students through a learning path, they’ll get confused and abandon it halfway through.
Here are the steps to take to structure your course in a logical and easy-to-follow way.
Build Your Course Outline
A good course outline can help you transform your ideas into a well-organized, well-structured course. Plus, it’s crucial to create a coherent learning path for your students. A bad outline – or a lack thereof – will only make the course messy and hard to follow.
But what is a course outline, and how do you create it?
Simply put, your course outline is a detailed plan for your course. Typically, a good course outline includes:
- Basic course details such as name and description,
- Clearly defined learning objectives,
- Course prerequisites and requirements,
- Learning activities outlined for each lesson and module,
- Supplementary learning materials,
- Milestones, including assignment due dates, quizzes, and final exams,
- Course schedule, especially for any scheduled live sessions.
To create your course outline, brainstorm everything you might want to include in your course. You can write your ideas down as a list, create a visual storyboard, or use a mind map. Begin with your main topic in the center and branch out from there.
At this stage, include anything related to your course topic that comes to mind. Later, you’ll need to organize these ideas into a coherent learning path through course modules and lessons.
Divide the Course into Modules
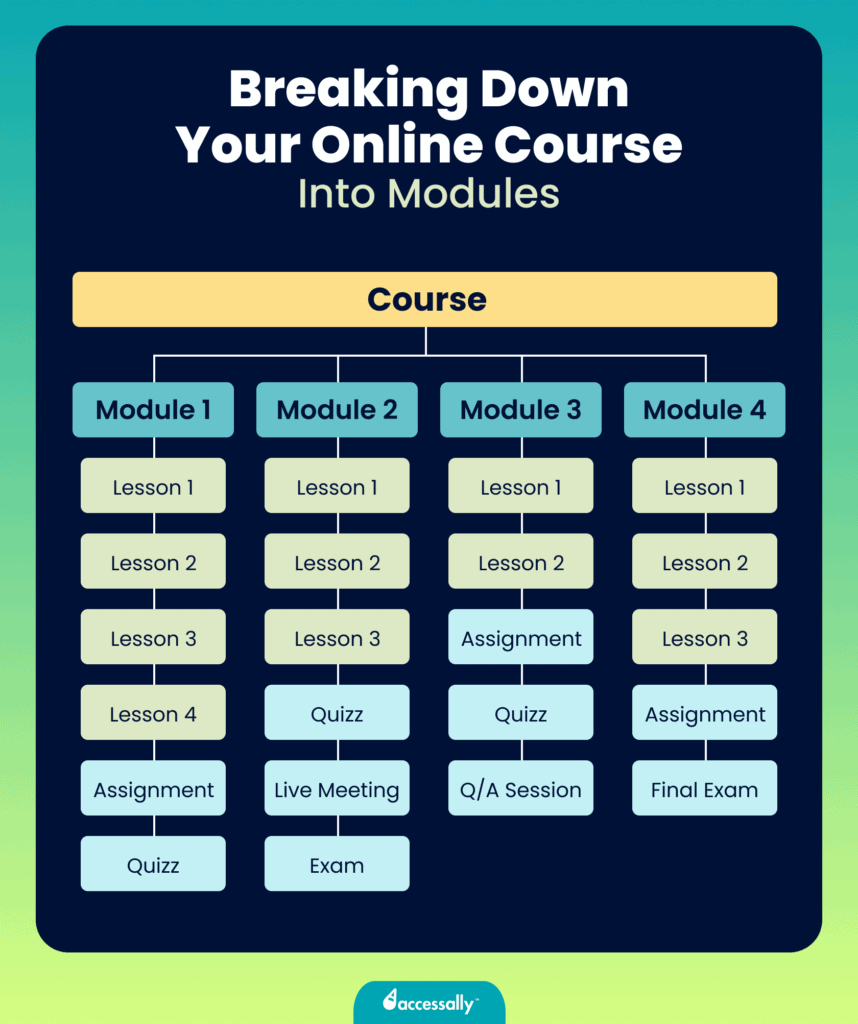
Once the outline is done, it’s time to break the course into modules and lessons. In online courses, the word “module” refers to a group of lessons on a specific sub-topic of the course.
Breaking your outline into modules – and then breaking down the modules into digestible lessons – is the most challenging thing about creating your online course structure.
You not only have to figure out how to break down your knowledge into bite-sized pieces and lay it out for your students, but you also need to connect all the course modules and lessons into a coherent and logical learning path that will be easy for them to follow.
The best way to do that is to determine point A (where your students are starting their learning journey) and point B (where your students end their learning journey) and then lay out and connect all the dots in between.
Typically, the content in each module will increase in difficulty and complexity as you go through the course, guiding your students from beginner level to advanced.
To plan out each module of your course, start with a clear goal in mind. Ask yourself:
- What do I want students to learn in each module?
- How does each module connect to the overall course objectives?
- Is the progression of topics logical and easy to follow?
- How can I ensure a smooth transition between modules?
Create a Proper Length and Depth for Each Lesson
One of the biggest trends bursting into the e-learning scene this year is the concept of microlearning.
Microlearning breaks lesson material down into bite-sized pieces that are easily consumed by students. It caters to those with short attention spans and makes it more convenient for students to participate in your online course by reducing the required time commitment.
Now, we’re not saying that microlearning is the only right way to create an online course.
You can just as well create longer, more in-depth lessons for your course. The right lesson length and depth will mostly depend on how complex your course topic is and your audience’s learning style.
⚖️ Length vs depth
Keep in mind that both lesson length (video length, content amount, etc.) and lesson depth (the complexity and number of concepts taught) should be considered as you break down your material into separate lessons.
A quick, 5-minute video that packs a ton of complex information might be as exhausting for your students to consume as a boring, 50-minute video filled with super basic info.
Create Lessons That Build on Each Other
After you decide on the amount (and depth) of material you want to include in each lesson, create a mockup for each lesson of your course.
Set up your lessons in such a way that they build on each other, with each lesson increasing in difficulty and challenge, like a staircase.
This format is especially important for skills-based courses, like learning to play a musical instrument or to speak a language, where the material starts out being extremely basic and grows exponentially in complexity as the course goes on.
Make the First Module The Most Engaging
Your first module or lesson can make or break the success of your entire course.
According to Make Learning Whole by David Perkins, giving students a big-picture overview of the whole concept you’ll be teaching (instead of breaking things down into parts and teaching each part separately) in the first module of your course is the best way you can start your course and set it up for success.
For some students, the first module might be all they need at the moment of signing up for your course, and they’ll dive deeper into the next modules as it makes sense for them to learn more specifics.

Produce Your Online Course
Creating your course is the longest part of the process. Depending on the course format you’ve chosen (more on that below), you’ll need to write a script for your videos or lives, create slides for each lesson, film and edit each video, prepare PDF worksheets or materials, etc.
Decide How You’ll Deliver Your Course
The delivery of your course is key to creating an engaging and effective learning experience for your students. There are many ways to deliver an online course, such as:
- Video and audio,
- Live (via Zoom calls or Facebook lives),
- Written format (via downloadable PDF documents),
- Interactive quizzes with progress tracking,
- A mix of everything.
When choosing the right format to deliver your course, consider both what you enjoy creating and how your students would best learn the content.
If this is your first online course, it’s best to deliver your content live via a Zoom call or a Facebook so you can interact with students in real-time. You can then use their feedback and suggestions to improve your course content before turning it into a video course.
If this isn’t your first time teaching an online course, you can pre-record your course content and upload it to your chosen platform.
Film Your Course
Today, the most popular way to deliver an online course is through video. According to Hubspot’s State of Video Marketing 2023 survey, people watch, on average, 17 hours of online video content per week.
If you’ve chosen to deliver your course via video lessons, you’ll need the right tools to film your videos. You don’t necessarily need professional-grade equipment to record your course, but quality does matter. To make sure your lessons come in good quality, it’s essential to:
- Invest in a good camera or use a high-quality smartphone for filming,
- Ensure good lighting to improve video clarity,
- Use a clear, noise-free audio setup, or invest in a good microphone,
- Choose video editing software that aligns with your skill level and course requirements,
- Use a teleprompter app that lets you read your script off your screen while looking into the camera.
Before you start filming your course, you’ll also need to decide on your recording style. You can deliver your video lessons in various ways. The main recording styles used by course creators are:
- PowerPoint slides with a voiceover and (optionally) your talking head in the corner,
- Screen recordings with a voiceover and (optionally) your talking head in the corner,
- Filming yourself talking to the camera.
Edit Each Video
Once you’ve decided on your recording style and filmed a few lessons for your course, you can begin editing the videos. The editing process can be time-consuming and tedious, so you’ll need to decide whether you want to give it a shot yourself or whether you prefer to hire a professional video editor.
The quality editing of your videos is essential to keep your students engaged while watching the course. If you decide to do it yourself, make sure to choose an editing software that’s easy to manage, and don’t forget to throw in a few effects, like subtitles, transitions, and different filming angles to keep the viewers engaged.
Step 3: Pricing Your Course
Pricing an online course can be challenging for new course creators. Many course creators think of pricing their course right before they’re about to launch it. But pricing shouldn’t be an afterthought. Deciding on your course price and pricing strategy right from the start will help you set the tone for your entire launch.
Here’s how to price your course effectively.
First, You Should Define Your Business Model
To price your course right, you must first decide on your business model. There are three main options to consider:
- Online courses: Self-paced courses that often consist of pre-recorded video lessons, quizzes, and downloadable resources. For this type of course, price it based on length, depth of content, and the perceived value it provides to your target audience. You can offer tiered pricing options for different levels of access.
- Cohort-based courses: Cohort-based courses involve a group of students progressing through the course together, often with scheduled live sessions, discussions, and collaborative activities. You may choose a one-time fee for the entire cohort or a recurring fee for ongoing access.
- Memberships: Memberships provide ongoing access to a library of content, resources, or a community. They are subscription-based, so you must set a monthly (or weekly) fee that aligns with the regular delivery of new content, exclusive resources, or community benefits.
Choose the Right Price
When it comes to pricing your online course, the goal is to find the sweet spot – a price that makes your course attractive to learners without being too expensive or too cheap. If your course price appears too low in comparison to other courses, potential customers might question its credibility and think it’s not valuable enough to invest in.
But don’t get caught up in a pricing competition with other course creators, as doing that will likely make you underprice your course. Instead, focus on elevating the perceived value of your course.
Here’s what to do when choosing the right price for your course:
- Evaluate your course type and content based on value, not just length.
- Align your pricing with revenue goals, audience size, and expected conversion rates.
- Understand your target audience and their willingness to pay.
- Research competitor pricing to position your course effectively.
- Factor in course creation and launch costs, including equipment, platform fees, and marketing budget.
Step 4: Pick a Platform to Create Your Online Course
You’ll need a place to host your course. Depending on your needs, there are three types of online course platforms you can choose from:
- Standalone online course platforms,
- Self-hosted WordPress LMS plugins,
- Online course marketplaces.
We already have an article about the best online course platforms that explains this in detail, so here’s a quick overview of each of these options and who it’s best for.
Also, take a look at the flow chart below to help you figure out which platform you should choose for your online course, depending on your situation.
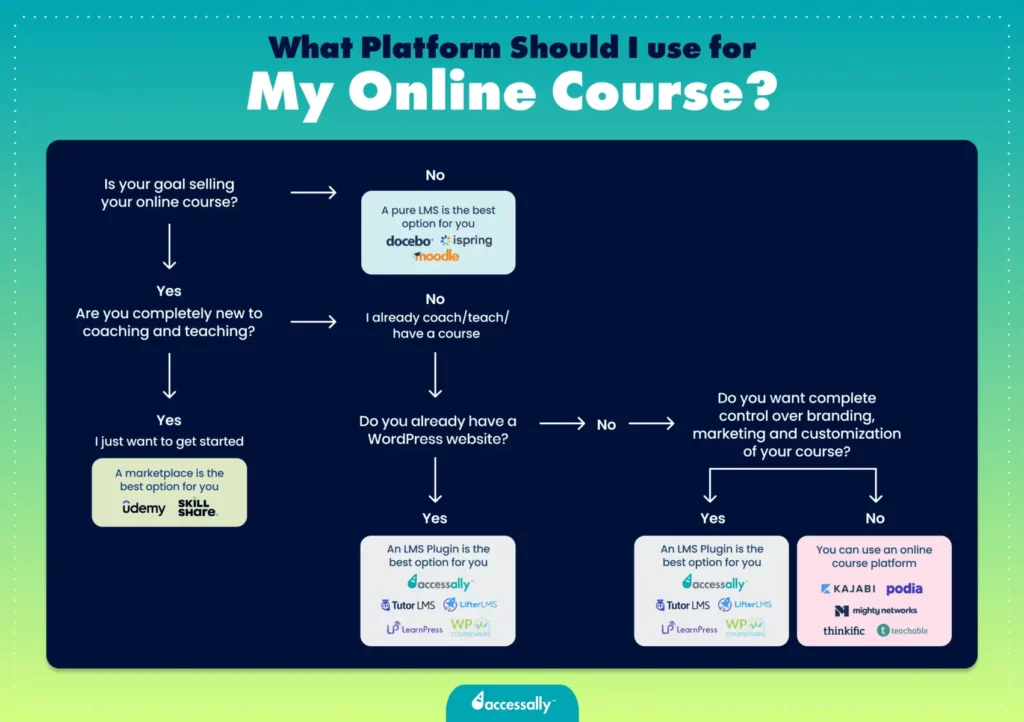

On Your Own Website (LMS Plugin)
LMS plugins like AccessAlly allow you to host your course on your WordPress website. They’re best for those course creators with a well-established WordPress website and for whom selling online courses is the main focus.
Because LMS plugins give course creators high customization options and total control over the delivery and branding of their courses, they also require more time and effort to set up.
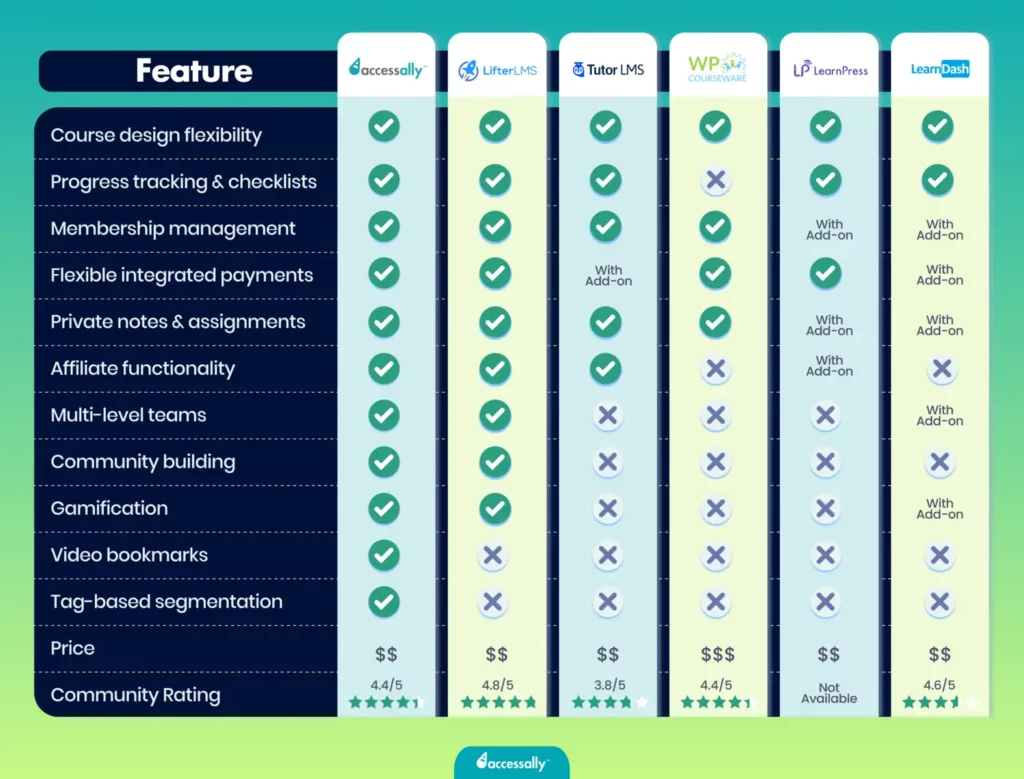

On an Online Course Platform
Online course platforms like Kajabi or Podia let course creators create, sell, and manage their courses from one place. They let you do everything from designing your course to taking payments and engaging with your students.
These platforms are great for course creators who already have an established audience to sell their course to (or plan to build one) but don’t have a WordPress website to self-host their course (or don’t want to self-host).
On a Course Marketplace
Course marketplaces act as matchmakers between course creators and students – you set up your course for sale, and the platform takes care of marketing it to its student base. That’s why marketplaces like Udemy and Skillshare are great options for new course creators who are just dipping their toes into online courses.
They’re very low effort because you don’t have to do anything to sell your course. This makes them an ideal choice for those who are doing it on the side or who don’t have too much time to dedicate to marketing their courses.
Step 5: Launch & Market Your Course
What does it mean to “launch an online course”? It can be done in three main stages:
- Structure your course: This stage involves structuring the course curriculum and designing your course for successful delivery.
- Plan your launch: Before announcing your course to the world, you must have a plan. This includes every step you’ll take to ensure the course will sell, from building an audience on social media to creating an email waitlist.
- Launch your course: That’s when you’ll start marketing your new course.
How much time does it take to launch an online course? Six months is a realistic timeframe, especially if you’re creating your course alongside other commitments. You could do it in less time if you dedicate yourself fully to your online course. However, it’s better not to rush the process and take the time you need to do it right.
If you’d like to know how to sell and promote your online course, we have a complete article that walks you through the process step by step.
