Thank You pages are specifically designed and optimized to give polite acknowledgement that an action on your website has been completed. This action might be an opt-in to your email list, a product purchase, or a contact form submitted.
But more than that, a thank you page enables you to connect on a human level with your website users. They give you the opportunity to say one last thing before the attention of the visitor is lost.
Setting up a Thank You page on your website takes a bit more planning and effort than most other pages. To help you through the process, we’ll walk you through the essentials, including:
Types of Thank You Pages
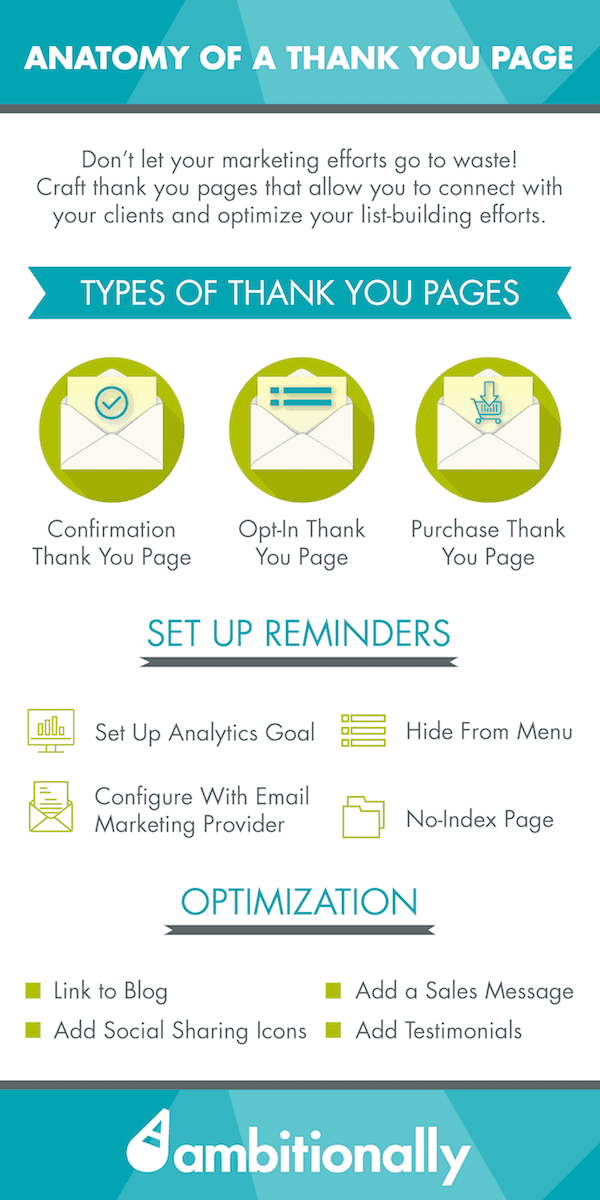
In general, there are 3 main types of Thank You pages:
The Confirmation Thank You Page
When someone joins your list for a webinar or other opt-in gift, they should be sent to this type of thank you page. The message on the page asks them to check their email and confirm their email address.
Known as a double-opt in, a two-step confirmation process greatly reduces the amount of unsubscribes that you receive for your email list.
Although many email providers provide a default thank-you page for this purpose, I really recommend that you create your own, as the default pages can’t be tracked through Google Analytics.
Find out more about the benefits of email marketing automation here.
The Opt-In Thank You Page
After the new subscriber confirms the email address and subscription to your list, they can be redirected to the opt-in thank you page. This would contain the free download or access to whatever opt-in gift you’re offering.
This particular page would be the second thank you page (the first is the confirmation) that your subscribers view after filling out the initial form.
The Sales Thank You Page
This type of thank you page is where you’ll send customers after they purchase something on your site. It’s an important page that provides confirmation that the transaction went through…and whatever other message you’d like to share.
How to create a Thank You Page in WordPress
A thank you page can be created the same as any other page in WordPress.
There other tools you can use to create your thank you pages (LeadPages, for example), but a WordPress page will work perfectly well.
Here’s how to create one:
After logging into your website, go to Pages > Add New.
Keeping in mind that you’ll probably have more than one thank you page on your website, make sure the URL and page title are descriptive enough so that YOU can differentiate the pages, but subtle enough so your website visitors don’t notice anything besides a nice “Thank You!”
The basic content is up to you (we’ll give some tips later on in this article).
Make Your Thank You Page Invisible.
One of the most important things to remember about your thank you pages is that they should only be chronologically visible.
In other words, there should be no way that the average online visitor ever finds your thank you pages unless they’ve filled out the right form or purchased the right product.
After all, you don’t want anyone to stumble across the Opt-In Thank You page that contains access to your free download UNLESS they’ve just taken the step to opt-in!
To make sure your thank you page remains invisible to everyone else, there are 3 things you should do:
Add A No-Index Tag
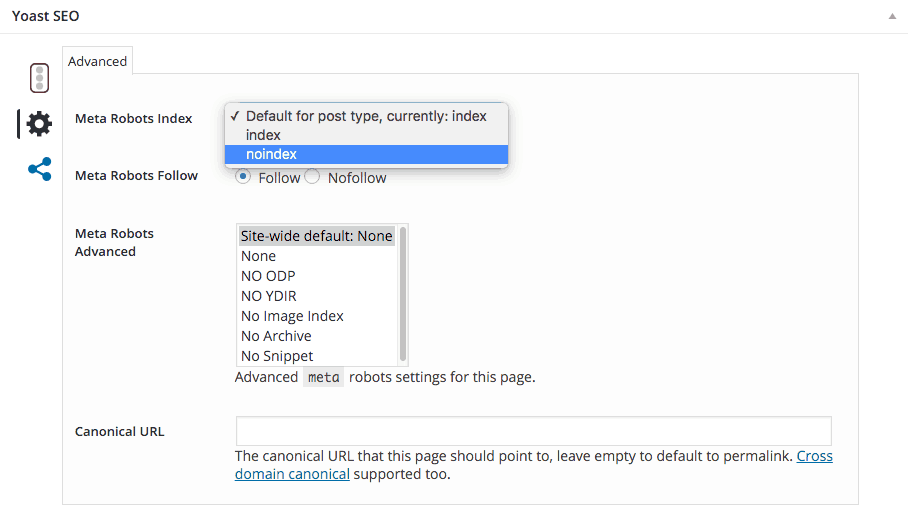

This little tag tells search engines like Google that this particular page should not be indexed or appear in searches.
Adding this tag to a page is super easy if you’re using an SEO plugin like SEO by Yoast. Simply scroll down to the bottom of your thank you page to find the SEO settings in your plugin, and mark as “no index.”
Hide Thank You Pages From Your Site’s Menu(s)
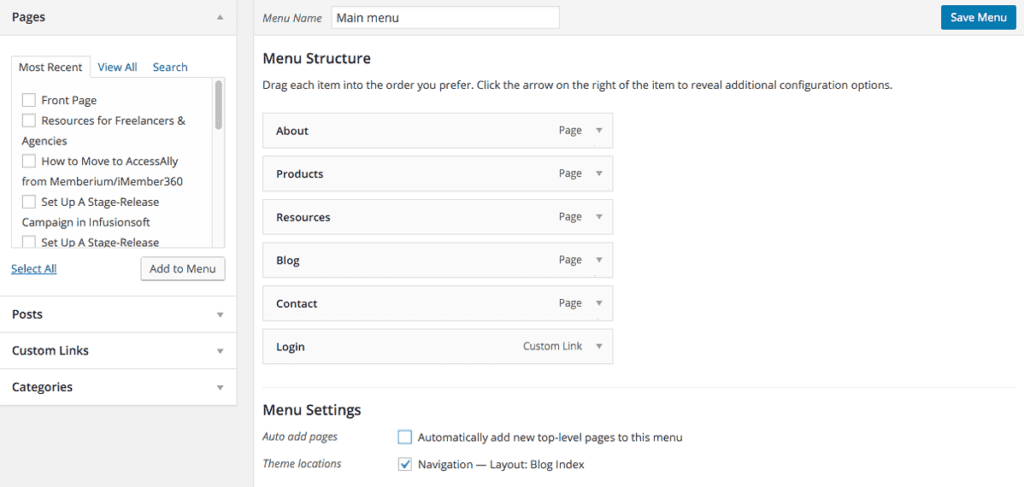

This should go without saying – but it’s always important to check to make sure that none of your site’s menus link to any of your thank you pages.
To check, go to Appearance > Menus, and check to make sure the “Auto add pages” is NOT checked, and that your Thank You pages are not currently included in your menus.
Don’t Link To Your Thank You Pages
The last thing to keep in mind is that you don’t link to your thank-you pages from any other pages on your website.
Your visitors will be able to connect with the thank you pages properly through the email provider of your choice, after you’ve set up the necessary opt-in forms and email lists for your subscribers.
How to set up a thank you and confirmation page in your email marketing system
The next step to integrate your newly-created thank you page is to set it up within your email marketing system. You’ll want to do this for the Confirmation and Opt-In thank you pages.
Here are links to the tutorials from some of the more popular platforms:
- MailChimp opt-in integration
- InfusionSoft opt-in integration
- MadMimi opt-in integration
- AWeber opt-in integration
- GetResponse opt-in integration
- Kit opt-in integration
- Ontraport opt-in integration
- ActiveCampaign opt-in integration
Configure the Thank You Page in PopupAlly
After setting up the Thank You page in your email list provider, PopupAlly users will also go into the PopupAlly plugin to designate the right page as the Thank You page.
Go to Display Settings, and check ‘Show Thank You Page Setup’ in the ‘How to stop showing this popup’ section. If your Thank You page has already been set up within WordPress, it can be selected from the list.
How To Add Tracking In Google Analytics
As business owners, it’s so important to be sure that our marketing endeavors are successful. Adding Google Analytics tracking is a super valuable tool that will help you track your conversion rates to find out if your list-building activities are working or not.
Here’s how to set it up:
(If you already have a Google Analytics account that’s connected with your website, skip to step 4.)
Step 1: Sign up for a free Google analytics account
If you already have one, great! If not, use your Gmail or YouTube account to login and create a new space for yourself.
Step 2: Set Up Your Website in Analytics
Within Google Analytics you can track more than one website – and each will have to be set up separately.
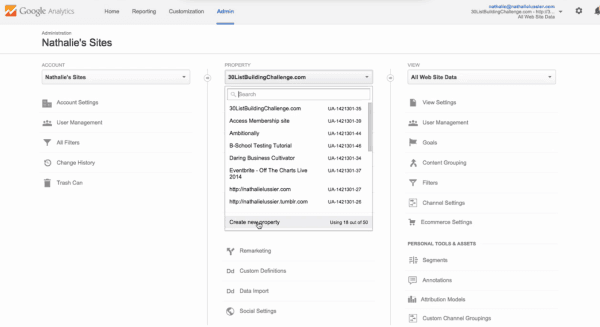
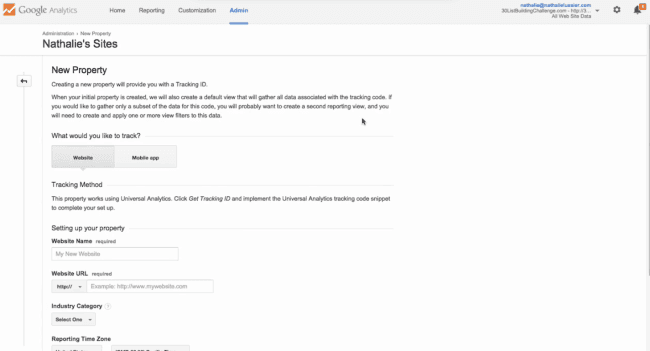
To do this, just go to Property > Create New Property.


Step 3: Authenticate Your Site With Analytics
The next step requires you to log into your website to give Google Analytics permission to track the data. You can do this with popular WordPress plugins like Analytics by Yoast. All you’ll need is the tracking code for that particular website from within your Analytics account.
Step 4: Set Up A Goal
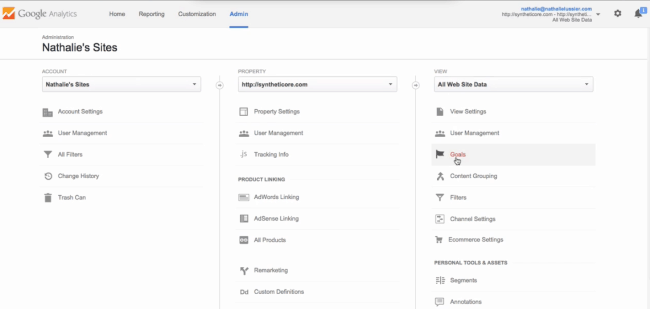

Steps 1 – 3 will make sure that your Google Analytics account is able to access and read the traffic data from your website. Now, you’re going to set a specific goal that will track the number of opt-ins that you receive.
Under Goals, select “Add New Goal.”
At this point, you just need to fill in the details for the new goal:
- Name: Give it a descriptive name that you can recognize (each opt-in will have a separate goal).
- Type: Destination
- Goal Details: this is the URL for your thank you page. Make sure the link is a relative link (example: /thank-you instead of yourwebsite.com/thank-you)
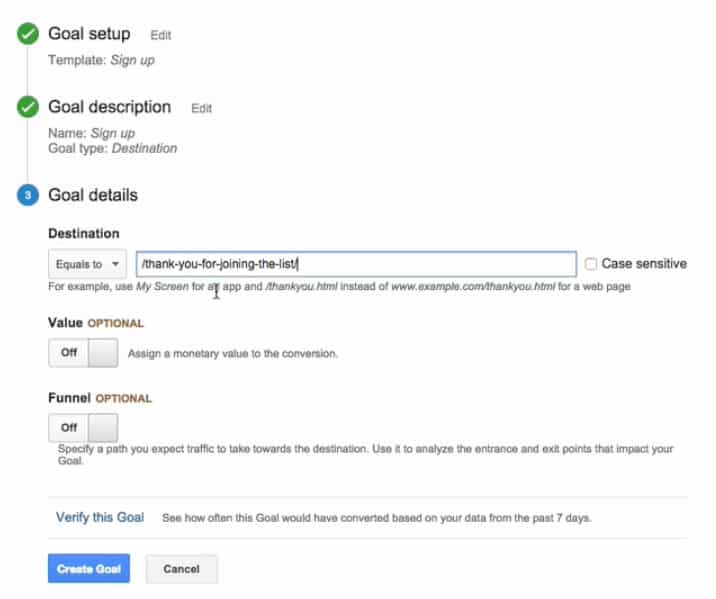

Create the goal and you’re ready to go!
At this point, the technical side of setting up your thank you page is completed…now it’s time to take it to the next level: optimization.
How To Optimize Your Thank You Pages
You created a supremely functional thank you page for your website… but is it designed for ultimate success?
All too often, a thank you page is simply a dead-end page. The visitor lands on this page, receives the bland Thank You, then clicks away and forgets the whole experience.
Don’t let this happen.
Your thank you pages can be used to give your clients a real opportunity to connect more deeply with your business.
When optimized properly, they can piggyback on the positive experiences and subtly present new opportunities.
This is pretty powerful, especially if you’re selling on WordPress and you have a paid offer to showcase!)
Here are a few different strategies to spruce up and optimize your thank you pages. Keep in mind that it’s probably best to only use 1 strategy per page.
Idea 1: Link To Your Blog
If you have some awesome content on your website, it’s worth linking back to the blog feed page or a single post that relates specifically to the sequence that’s just been completed.
This is a nice option if you have a more specific form on your website (web designers might have a Help Ticket form for their clients, in which case a link to a blog “5 Ways To Troubleshoot Your Website Problems” might be a good one to include on that form’s thank you page.)
Idea 2: Add a Sales Message
Consider adding a sales message to any of your thank you pages. This sales message could be an upsell, or you might want to directly include a small purchase or product on the thank you page itself.
For example, if we had an opt-in thank you page for a webinar on List-Building, it might make sense to include a “$1 Free Trial” for our product PopupAlly Pro on that page.
When adding a sales message, just make sure that the product you’re selling is logically connected with the actions that the user has just taken. If it’s too far-fetched and doesn’t convert, it’s just a waste of space.
Idea 3: Add Testimonials
Adding a small variety of testimonials is a great idea for a simple Contact Us thank you page.
Testimonials will pat the user on the back to say “See? It’s good that you contacted this person. Look how much other people like working with them!”
Idea 4: Add Social Share Buttons
One of the best ways to build in social sharing, is to ask people who have just opted into your email list… to share your opt-in with their friends on social media.
Most people use social media sharing plugins, but if you have a social share button on your “thank you for signing up” page, then you’re having people share that page and not the main “opt-in page.”
So what’s a smart website owner and list builder to do?
By adding social media share buttons, and here’s how!
Here’s an example from the free 30 Day List Building Challenge (feel free to test these out and share!)


