You’re creating an online course… and it’s packed with high-quality video presentations, quizzes, and in-depth content for your students.
The videos themselves are professionally recorded and include every bit of info your students need to ace this course.
There’s just one problem:
Each video is over 45 minutes long. Forty-five information-packed minutes.
And you know that it’s going to be a struggle for students who may have to re-visit the material several times before they have it mastered.
A Catch 22: Should you sacrifice length or ease of use?
At this point, you’re kind of at a crossroads… because each bit of the video is necessary. If you start trying to cut it shorter, your students won’t get the “full picture” of your lesson.
Granted, one solution is to simply cut the video into several smaller “chapters,” each embedded separately on the page.
The only problem with this method is that you lose the cohesive nature of the full video, and add a lot of editing work on the side. (Not to mention uploading and managing a ton of different files!)
But one thing is certain: you have to find some way to take a lengthy video and make it more manageable for a student to consume in an LMS environment.
Why It’s Important to Break Down Your Longer Video Presentations
According to StatisticsBrain, most people watch 2.7 minutes of a single video at a time.
Contrast that with the 10 minutes on average that a student can pay focused attention in an in-person college class.
That’s why the online learning scape is fairly unique, because you rely on the motivation and time budgeting skills of your students.
And the thing is, many online students just aren’t able to set aside big chunks of time for learning.
An instructor’s job is to make the lesson easier – not harder – to digest.
This might be because they struggle to focus for longer than 20 minutes, or because they have kids to take care of, or maybe a few appointments to run to…
In any case, if your video is longer than a handful of minutes, it’s likely that your students will be hitting pause at several points out of practical necessity.
Then, there’s also the reality that each student has a different method of studying that works best.
So if you’re covering several main points in the video, expect that serious students might want to revisit the material more than once.
Timestamps Might Just Save your Course
At this point, there’s a pretty obvious solution: video timestamps, or bookmarks.
Doing the legwork in advance to mark each lesson’s timestamp inside your video allows your students to be more efficient with their time.
You Could Record Timestamps Manually…
What most of us do in a pinch is to make this happen is to manually record the necessary timestamps, like so:
- Review Tip 1: 00 min 34 seconds
- Review Tip 2: 01 min 18 seconds
- Review Tip 3: 01 min 54 seconds
There. Done!
Now, your students have a reference point so they can jump ahead to whatever point they need in the video.
Or You Could Let this Video Bookmark WordPress Plugin do It For You!
If you’re building an online course, chances are high that you’re already using software to create quizzes, checklists, etc. to help your students succeed.
So why not let this software do the dirty work of making your video bookmarks even easier to use?
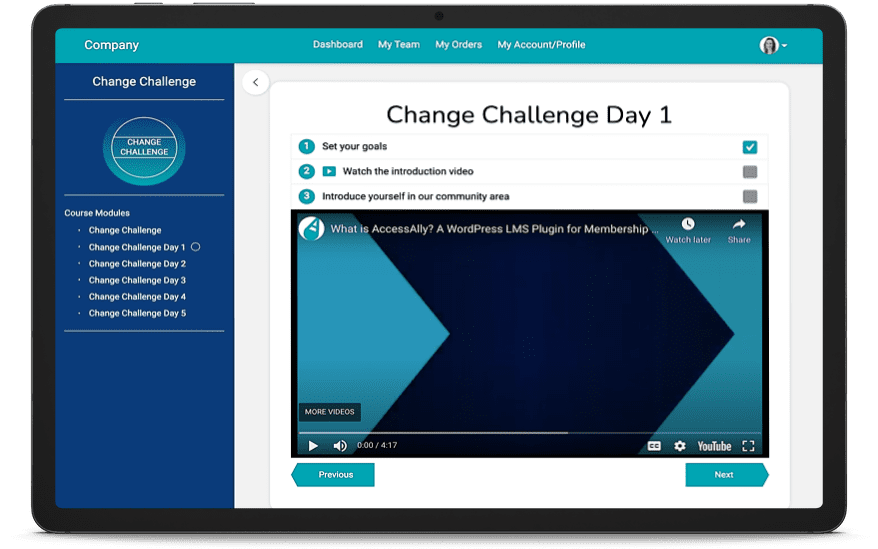
If you’re using AccessAlly as your learning management system, you’ll just create your timestamps for each video, then add a list of objectives. Each objective will correspond to a particular video bookmark. Once clicked, it automatically jumps ahead to the segment of the video you want to watch next:
Cool, right? And so easy.
Here’s how you can set it up.
How To Add Video Bookmarks On WordPress
The easiest way to add video bookmarks on WordPress is by using a WordPress-specific plugin: AccessAlly Pro.
Step 1: Add A Video Objective
When installed, AccessAlly Pro features are available on any WordPress post or page. You’ll start out by adding an objective (which appears as one of the checklist items).
With AccessAlly Pro, video bookmark objectives can be created for any video hosted on Vimeo, Wistia, or YouTube.
Step 2: Define your video objectives
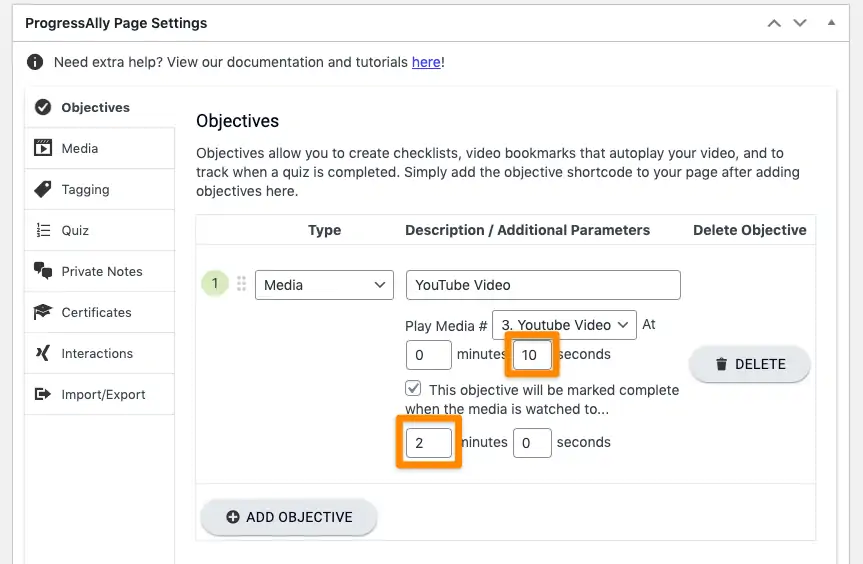
With each video bookmark, you decide how the “objective” appears on the checklist, as well as how many/which videos you use:
- Video #: You’ll have to assign a number to each video that you embed on the page, so AccessAlly Pro knows where to apply the video bookmarks. If you only have one video embedded on the page, you only need to use one number in the checklist settings.
- Timestamp: Next, you can specify where each “bookmark” should be placed in each video. (Bonus: there’s no limit to the number of bookmarks you can place in each video!)


Step 3: Add Your Checklist To the Page
After you have all of your bookmarks set up, it’s time to add the checklist to the page. This is done with the easy-to-use shortcode-adder.
Step 4: Add Your Video(s) To the Page
With the checklist on the page, you can embed your video(s) as needed… once again using the shortcode adder.


This matches each video embedded on the page with its source URL AND the designated number in the bookmark settings.
Step 5: Double Check!
As always, test the functionality a few times to make sure you have the bookmark timestamps recorded correctly… and that the movie plays properly!
Video Bookmarks = A no-brainer
In the end, if you’re offering an online course that relies heavily on video presentations, video bookmarks are a necessity.
First of all, because they make it ridiculously easy for your students to stay engaged and focused. But each checklist created with AccessAlly Pro can be used in conjunction with course-wide progress tracking, quizzes, etc.
It’s a one-stop-shop deal that’s really designed to enhance your students’ online experience… and increase the reputation of your online course in the process.


