If you’re reading this, it means that you’ve decided to create an online course and host it on your WordPress website. Whether you already have an established site on WordPress or plan on creating one for your course, self-hosting your online course is the best option if you want to have full control over your course customization, branding, and delivery.
Aside from your WordPress website, you’ll also need a WordPress LMS plugin to create your course with WordPress. While setting everything up may seem quite overwhelming at first, this is the best way to grow and scale your course beyond the limitations of other online course platforms.
This guide will walk you step by step through the process of creating your online course with WordPress, whether you already have a website or you’re starting from scratch.
What You Need to Create an Online Course in WordPress
Before you dive headfirst into creating your online course, there are a few things you must prepare and decide on in advance. These are:
- A quality website hosting provider,
- Self-hosted WordPress.org software (not the .com version),
- A course content plan,
- A WordPress LMS plugin.
In this section, we’ll explain the specifics of each element you need to build your online course.
A Quality Website Hosting & Domain Name
The first thing you need for your online course is, of course, a website. And, as you may already know, to build a website, you’ll need two things:
- A hosting provider to host your site: Think of it as renting a house where your site will live. You’ll want to choose a high-quality and well-established hosting provider for your website, just as you’d rather rent a house from a high-quality, well-established real estate agency. Your hosting provider will ensure your site is stable, secure, and reliable throughout the entire time it’s active.
- A domain name: Think of it as the name on the mailbox in front of your house. You have to choose your domain name carefully. You want it to be something that reflects your brand but isn’t too narrow and allows for future expansion.
The domain name should typically come first. Once you’ve chosen your hosting provider and subscribed to your hosting plan, you’ll need to connect your domain to your hosting.

A Self-Hosted wordpress.org Software
There are two ways to use the WordPress platform: wordpress.org or wordpress.com. The main difference between the two is how your site is hosted.
- WordPress.org is a free, open-source tool you can download and install on your hosting account. This is a self-hosted option, so you’ll need a separate hosting platform.
- WordPress.com is a paid tool (although it does have a limited free plan) that is hosted and maintained by Automattic. In other words, this is a managed hosting option, so you won’t need a separate hosting platform.
For online courses, WordPress.org is the one that gives course creators the ultimate stability. This is because WordPress.org is a self-hosted option, so it’s highly customizable and offers great flexibility when it comes to selecting and installing themes, page builders, and plugins.
If getting a hosting provider is like renting a house where your website will live, then choosing WordPress as your CMS is like having a contractor on call. Want to add a couple of classrooms? Cool, they’re on it. Want to add a second story and a kitchen? They’ll make it happen!
That is the beauty of WordPress.org. You have a great amount of control to create your online courses any way you’d like.
🛠️ Note: WordPress.com by Automattic states that you can use plugins at the higher paid tiers. However, much of the functionality (hosting, security, code, etc.) remains “under the hood” and inaccessible. That means many of the plugins and themes we recommend end up being glitchy and ineffective when installed on a WordPress.com account. For this reason, we recommend building your course website using your own hosting provider and a free WordPress.org software installation.
A WordPress LMS Plugin
A WordPress LMS plugin is the tool you’ll need to create your online course on your website. Without an LMS plugin, your site won’t have the necessary capabilities to let you host, create, and sell online courses.
These plugins are designed especially for WordPress to enable course creators to host, build, and sell their courses from their own WordPress site. They’re the best way to help you scale and grow your online course business because they allow you a great deal of control over your course customization, branding, and delivery.
There are a few WordPress LMS plugins to choose from, and at first glance, they may all look pretty similar to you. While they all offer similar features, the main difference between them all is the number of add-ons you must install to unlock their full functionalities, such as restricted access to content, checkout forms, progress tracking, etc.
The problem with this is that the more add-ons you install, the higher the risk of compatibility issues that can cause your site to bug or crash.
Unlike other WordPress LMS plugins, AccessAlly is an all-in-one platform that allows you to create, sell, and manage all your courses and memberships without the need to stack a ton of add-ons on top of each other.
💡If you’re wondering which WordPress LMS plugin to choose, we’ve got an entire article where we cover the best LMS plugins for WordPress in detail.
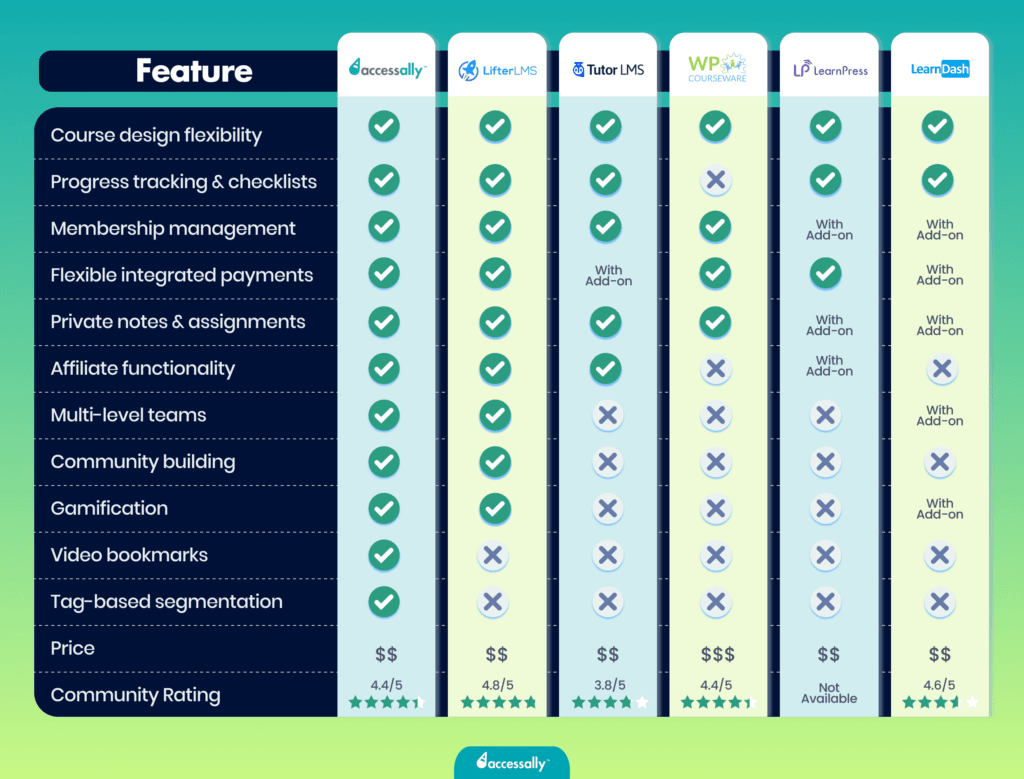
And if you want a quick overview of all your options, take a look at the comparison table below.

Course Content
The last thing you need to do to create and sell an online course is, of course, to prepare it. There are a few things you must decide on when creating your course:
- Your course topic (what will it be about?)
- Your course content (what information and value will it deliver?)
- Your delivery format (pre-recorded videos, live calls, written content, slides, audio recordings, or a mix)
- The amount and size of the courses you’ll create (for example, one signature course or a few mini-courses)
Once you’ve got an idea about your course content and delivery, you’ll need to start creating your course from scratch – build your course outline, record the lessons, etc.
You should do all that before you start designing your website. That’s because your website design should match your course content. Doing it the other way around would greatly limit your options when it comes to creating content.
That’s why an all-in-one LMS plugin is the best solution for course creators. It allows you to design your site to match your course content rather than having to match your course content to the constraints of the platform.
💡We’ve outlined how to do all this in detail in our article on how to build an online course from scratch. We also have another detailed article on how to launch a profitable online course.
Steps to Create Your Online Course in WordPress
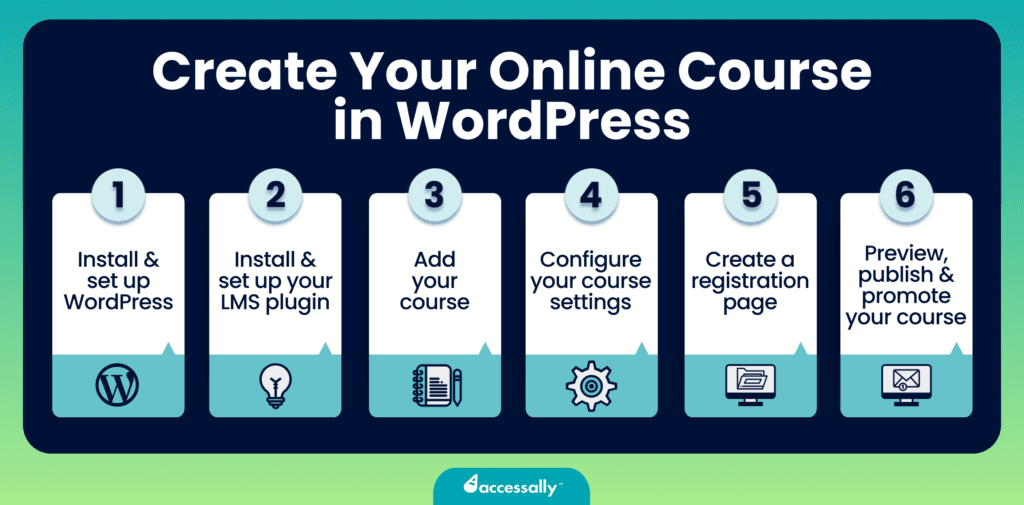
Step 1: Install and Set Up WordPress (If Needed)
Do you already have an established WordPress website? If so, skip this step and go straight to the next one. If not, keep reading!
The first step to getting your course online is to set up your WordPress website.
As we’ve already explained, there are two ways to use WordPress: the .com and the .org versions. The key to creating a site that allows you to customize it fully is to go with the WordPress.org version of WordPress. This is the one that provides limitless customization possibilities and has a very user-friendly administration panel.
Here’s how to set up your WordPress.org website.
Purchase your hosting plan and domain name
Before you can install WordPress on your site, you need to purchase your domain name and your hosting plan. We’ve already briefly explained why these elements are crucial when building a site.
A key thing to remember here is that both your domain name and hosting provider will stay with you for a long time, and it can be quite complicated to change them once you’ve got everything set up and working well. So, give it a lot of thought before making the final commitment.
Most course creators choose a domain name that reflects their name (for example, www.janedoe.com) or their brand name (www.brandname.com). Your domain extension is also very important. Typically, the .com extension is the best choice for your domain, but you can also opt for alternative ones, like .net, .co, or .us.
You can buy your domain name from a couple of great domain registrars, such as:
- GoDaddy,
- Namecheap,
- Domain.com.
When choosing your hosting provider, opt for a well-established one with reliable server performance and high uptime (anything about 99%). Also, make sure to select a provider that prioritizes site security and includes SSL certificates.
As for hosting, some of the best-rated hosting providers are:
- Bluehost,
- HostGator,
- GreenGeeks,
- Hostinger,
- SiteGround.
Choose a WordPress theme
Another thing you’ll need to be able to build your site on WordPress is a WordPress theme.
If the WordPress software you install on your hosting account is the contractor on call, then your WordPress theme is the construction plan they must follow to construct your house. Just as a builder needs a blueprint or plan to build a house, you need a theme to define the design, layout, and overall appearance of your site.
A WordPress theme is a collection of templates and stylesheets that determine the overall design and functionality of your website. It dictates the layout of your pages, the placement of elements, and the general look and feel.
There are two types of WordPress themes (we recommend the second):
- Pre-designed themes which come with a pre-determined site layout and only allow limited customization. They can be customized some more using CSS coding.
- Theme builders which come with a visual site builder that allows you to design your site any way you want without coding knowledge and within very few limits.
The most popular WordPress theme builders are:
- Divi
- Elementor
- Astra
- OceanWP
- Genesis Pro
Step 2: Install and Set Up Your LMS Plugin
Once you’ve got your WordPress site up and running, it’s time to install and set up your chosen LMS plugin.
Choose your LMS plugin
When choosing your WordPress LMS plugin, pay attention to factors such as:
- The feature suite (does it align with what you’re looking for?)
- The number of add-ons required (avoid add-on stacking)
- The user-friendliness (is it easy and intuitive to use?)
- Scalability (can it grow with your course?)
- Pricing plans (does the cost jump significantly as you grow?)
There are many LMS plugins to choose from. We’ve got an entire article detailing the best WordPress LMS plugins on the market that you can consult to help you make your decision.
Install and set up your LMS plugin
To integrate your LMS plugin with your site, you’ll need to install it in your WordPress admin panel. It can typically be done in a few easy steps, and the process is relatively straightforward. For most WordPress plugins, the steps are as follows:
- Download the .zip file of the plugin to your computer.
- Log in to your WordPress admin panel
- Go to Plugins -> Add New -> Upload Plugin
- Upload, install, and set up your plugin.
However, keep in mind that this is just a basic and general instruction. Each LMS plugin has its own way of being installed and set up, so this process might change a bit depending on the plugin you’ve chosen.
💡If you’ve chosen AccessAlly, you can learn more about how to install it on your WordPress site in our Installing the Plugin guide and our user guide.
Step 3: Add Your Course
Once your WordPress site is built and you’ve correctly installed and set up your LMS plugin, it’s time to start adding your course to your site.
The specific instructions for adding your course content to your WordPress site will differ depending on your chosen LMS plugin. Still, if you’ve already prepared all of your course content, such as video lessons, worksheets, PDF materials, etc., you should be able to upload them quite easily to WordPress using your LMS plugin.
After your lessons are uploaded, you’ll be able to create quizzes, certificates, and other interactive elements to go along with the lessons and speed up your students’ learning process.
Make sure to keep a copy of every course lesson and material you’ve created outside of your WordPress LMS plugin as a backup in case you ever need to re-upload it or post it to another platform.
💡If you’ve chosen to build your online course with AccessAlly, you can read the specific instructions on how to add your course content to your WordPress site in our tutorial article.

Step 4: Configure the Course Settings
To make sure that your course is set up the way you intended, you’ll need to configure it to match your criteria. For instance, you may want to restrict access to certain areas of the course until your students reach a specific level, set up progress bars for students, or create a membership.
Typically, there are three key settings you’ll need to configure.
Configure pricing models & payment gateways
Before your course is ready to sell, you’ll need to decide on the pricing model (one-time payment or subscription-based) and the payment options you’ll accept (credit cards, PayPal, Stripe, etc.). You won’t be able to receive money for your course unless you set your pricing and payment settings in your LMS plugin.
Implement restrictions if needed
You may not want to give your students access to the entire course at once but rather let them slowly unlock each new module as they go. Or, you may want to guide students through a logical learning sequence by implementing restrictions based on prerequisites or achievement levels.
Most LMS plugins will allow you to restrict access to certain areas of your course or drip-feed your content.
Create a membership subscription
If you’ve decided to create a subscription-based membership for your course, you’ll need to set up things like membership tiers, the duration of each tier, and renewal options to enhance the overall learning experience for your students. If your LMS plugin allows you to create a membership, you’ll be able to configure its duration and terms easily.
Step 5: Create a Registration Page (or landing page)
Now that your course is created and added to your site, the next step is to create a registration page, which will function as the gateway for students to sign up and enroll in your courses.
Essentially, a registration page is a page where students can create their username and password to access your course content. And while it may seem like it’s just a boring element of the enrollment process, it can change how users experience your site.
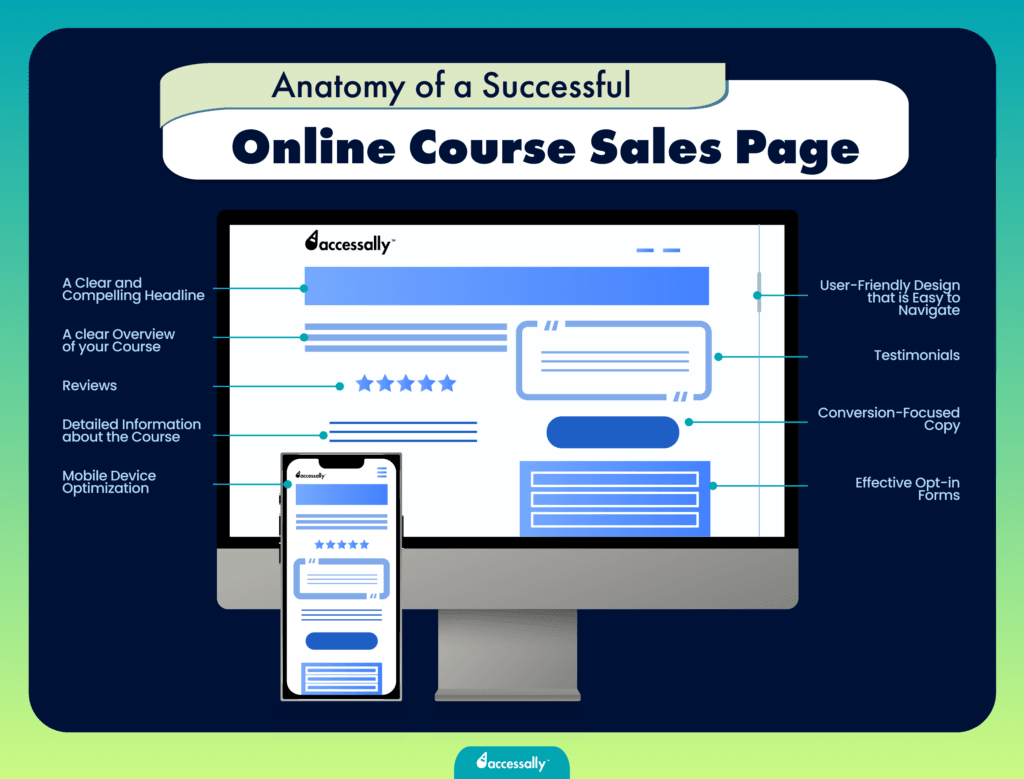
To make the enrollment process quick and easy for your students, make sure that your registration page is intuitive, has a clear call to action, and has a straightforward design. Don’t clutter it with design elements or unnecessary information. Keep it short and simple.
Remember that the registration page is the door to your course. When new students sign in for the first time, you may want to give them a quick tour of what they’ll find inside. You can do it through a short introduction video, a site walkthrough, or short written instructions.
Also, don’t forget to send your students a confirmation email that informs them of a successful registration and reiterates their login details. You can take this opportunity to welcome them to your course and provide them with the next steps they need to take as they dive into your course.
See below the anatomy of a perfect online course sales page:

Step 6: Preview, Publish and Promote Your Course
Now that your online course is properly set up, it’s time for the final step: to promote and launch it to your audience. But make sure to preview your course before hitting the publish button. This will ensure that your course is free of errors and ready to be consumed by your students.
The best way to go about launching your course is to create a landing page where interested students can learn more about your course and to send a few email campaigns to your email subscribers to promote it (if you’ve already built an email list).
However, there are many other ways to launch and promote your online course, depending on the marketing strategy you’ve chosen.
We won’t dive into the specifics of promoting and launching an online course, as we already have an entire article dedicated to that topic that walks through the steps you must take to sell your online course.
Examples of Amazing Online Courses Created Using WordPress (and AccessAlly)
If you’re looking for inspiration, here are some examples of coaches who have successfully scaled their businesses with online courses and memberships using AccessAlly.
MaYoga, a membership for moms
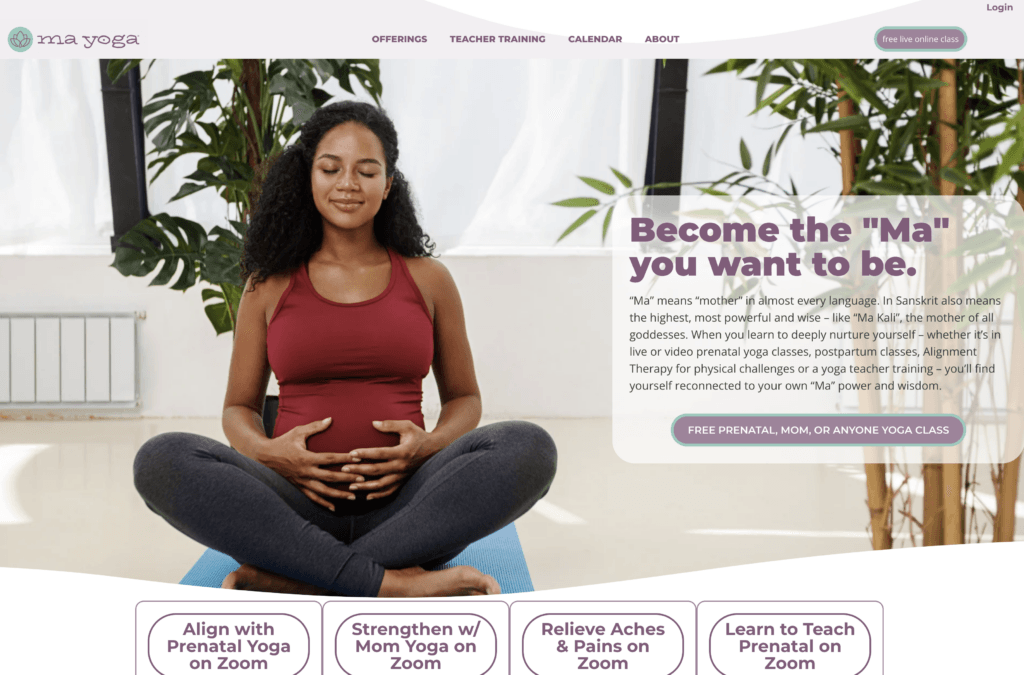

In 2009, Jessica Jennings launched MaYoga, a prenatal yoga school for pregnant women and new moms. It quickly grew to 10 locations in Southern California. Soon, Jessica realized that moms all over the country wanted her help. That’s when she decided to put all of her teachings online.
Today, Jessica runs a successful membership, providing digital resources for moms to curate their own yoga practice. To do this, she needed an LMS plugin that would allow her as much personalization as possible within her membership program. That’s why she chose AccessAlly.
Your Health Coach Biz, a membership for health and wellness coaches


Once a real estate agent, Rachel Feldman decided to make a change and become a health and wellness coach. While running her business alone, she faced countless challenges doing everything – from creating content to marketing – on her own.
As she continued coaching, she created many high-quality resources to help her support her clients, and soon enough, she started getting attention from other health and wellness coaches who were struggling to provide the same high-quality resources to their clients.
That’s when Rachel saw a chance to fill in a gap in the market. So, she changed her business to offer ready-made programs and content to health and wellness coaches through a WordPress members-only area. Now, with 180 programs – all built with AccessAlly – Rachel supports thousands of coaches worldwide.
Web Designer Academy, an online course for web designers


Shannon Mattern began her freelance web design business as a side hustle, juggling it with a full-time job. At first, she found her niche in teaching other business owners how to build their websites with easy-to-consume resources to guide them through the process. Now, Shannon helps other women web designers scale their web design business. With AccessAlly, she has built her signature online course, the Web Designer Academy, where she teaches everything she’s learned while scaling her own web design business.


